<a href="menu.shtml">Table of Contents</a>
<br>
Tips for Advanced Cropping Users
The batch cropping window has some special hidden features (hot keys) that allow an advanced user
to maximize their cropping output.
They are:
- Press CTRL-C instead of clicking Crop, Save & Load Next
- Press CTRL-S instead of clicking Save, Load Next
- Press CTRL-X instead of clicking Next Photo
- Press CTRL-D instead of clicking Previous Photo
- Press CTRL-Z instead of clicking Crop
- Press CTRL-R instead of clicking Reset Photo
- Press CTRL-O to: Show / Hide Save Options
- Press CTRL-T to: Show / Hide Tool Buttons
- Press CTRL-A to: Show a list of the Hot Keys
- Press CTRL-B to begin Auto Batch Cropping
- Press and Hold ESC to Abort Auto Batch Cropping
Important Note:
If the hot keys above do not work, simply left click the photo once to turn
them back on.
Auto batch cropping mode is when you select thousands of photos, start the batch crop, and walk away from your
computer while it crunches through your photos, cropping and saving each per your criteria.
Important Note: If you intend to use batch cropping, you should read and fully understand
this entire page. There are many variables involved when cropping a photo. When done manually, the human factor can easily
resolve all variables. But automated cropping uses mathematical algorithms and rules to make the decisions for you. It is best to understand these rules and their behavior.
Note the following button:
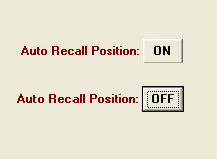
When Auto Recall Position is turned Off, the crop box will automatically be centered in the image and the orientation of the crop box will match that of the displayed image.
When Auto Recall Position is turned On, the crop box size, orientation and position will be remembered from the first crop you make, (see various behaviors below).
Auto Recall may be used in manual batch cropping or in auto batch cropping.
Important Note:Once you crop the first picture, all subsequent positioning of the crop box
will use the same location, size and orientation as the first crop you perform. If you wish to change this in the middle of a
manual batch cropping session, (without closing the crop window), you may do so by simply turning Auto Recall off
and then immediately back on again. This will reset the auto recall and
the very next photo you crop will use the new standard.
Three Modes of Cropping:
- Use No Ratio, (this mode selected in picture below).
- Cropping Ratio Selected ( ex: 4 x 6 or 8 x 10 etc. )
- Pre-Set Pixel Size ( ex: 320 x 240 )
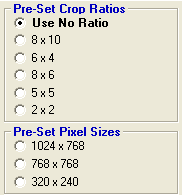
When Auto Recall is turned on, the three modes have the following behaviors:
- Use No Ratio, this method remembers the size (in pixels), position (in pixels) and orientation of the crop box.
- Cropping Ratio Selected, this method only remembers the cropping ratio and the orientation.
The crop box is centered and maximized, this method is the most
useful when cropping a variety of photos with different orientations and sizes and you
wish them all to have the same shape and orientation. This method can not guarantee exact
pixel sizes as it is based on a shape, not a size.
After using this method, you could batch resize them to make them all have the same exact pixel size.
- Pre-Set Pixel Size, this method is similar to method 1. It will remember the exact size (in pixels), exact position (in pixels), and orientation.
The difference is that it will use the preset pixel size you have selected. Because it
is basing the pixel size on a preset size, this method is more reliable than method 1.
Important Note:
Batch cropping can produce unexpected results, but not unpredictable results,
if you have a batch of photos that
have different orientations or sizes.
Batch cropping will produce expected results if all photos in the batch are of the same size in pixels and orientation.
Example: All photos are oriented landscape and 3000 x 2200 pixels.
Predictable Results:
Let us say you are cropping a folder of pictures and these photos have a variety
of sizes and orientations. And you are not using the Crop Ratio mode.
The results are predictable.
The crop box position/location is measured in pixels, from the top of the photo to
the top of the crop box - and the left of the photo to the left of the crop box.
In the image below, let the purple area represent the first photo. On the first photo, you will size and position the crop box.
All subsequent photos will be cropped in the same location.
The distance from the left of the photo to the left of the crop box is remembered, along with the width of the crop box.
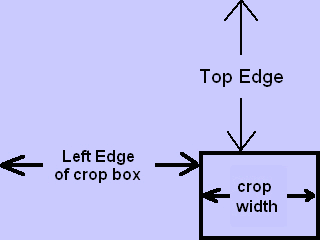
You now start the batch cropping operation and let's say, as an example, the 10th photo is oriented differently or is a smaller size.
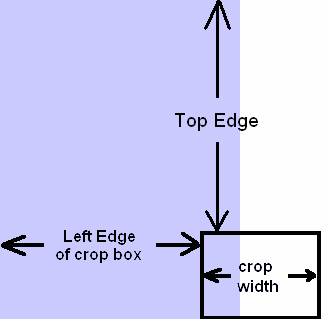
The remembered left edge value (plus) the crop box width exceeds the width of the photo.
In this example, it is not possible to place the crop box in the correct location.
The Rule: In this situation, the crop box will be moved to the left until it
is entirely inside of the photo. In this case, the crop box will be moved to the lower
right corner. The top position does not change.
More Rules:
- If the crop box is wider than the intended photo, the crop box width will become the
entire width of the photo.
- If the crop box is taller than the intended photo, the crop box height will become the entire height
of the photo.
So, it is possible that a small picture will not be cropped at all.
Let's look at this in the opposite direction:
Let us say the first photo you cropped was a small photo (640 x 480 pixels) oriented landscape...
and you selected a crop size of 250 x 150 pixels and positioned the crop box in the lower right corner:

Auto recall will remember the following information:
Position the crop box 390 pixels from the left
Position the crop box 330 pixels from the top
Crop box width = 250 pixels
Crop box height = 150 pixels
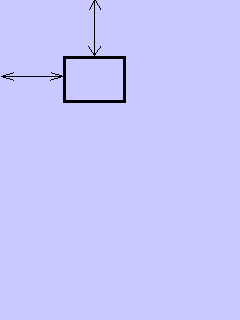
Let us say the next photo that comes up is 960 x 1280 pixels in size, orientated portrait.
The results are predictable.
The crop box will not be in the lower right corner, but near the upper left corner as follows:
If the above information does not make sense, then the rule of thumb is this:
- Always use a Crop Ratio when cropping photos to various sizes and orientations.
- When using a Preset Pixel size, try to only crop photos of the same size and orientation.
Important Note About Accuracy:
You may observe a positional or size accuracy issue of ( + or - 1) when using Auto Recall.
The quick explanation is:
Your monitor is a certain size. Example: 800 x 600 pixels.
The photo you are cropping is, for example, 3072 x 2304 pixels.
When this photo is displayed, it is squished to fit inside of the window. So it may be displayed at 1/4 its true size.
During the mathematical conversions between: screen size, squished size, true size and crop box size, there can be rounding errors which
can throw this off by a pixel one way or the other.
You can minimize or avoid these rounding errors by:
- Using a preset pixel size will reduce the problem because it uses less math conversions.
- Maximize the cropping window. This will make the photo as large as possible.
- Use a larger monitor if you have one available.
- Increase your monitors resolution. If you have it set to 800 x 600, increase it to 1024 x 768.
Cropping Preferences
Click the Hammer button in the crop window to enter the cropping preferences: 
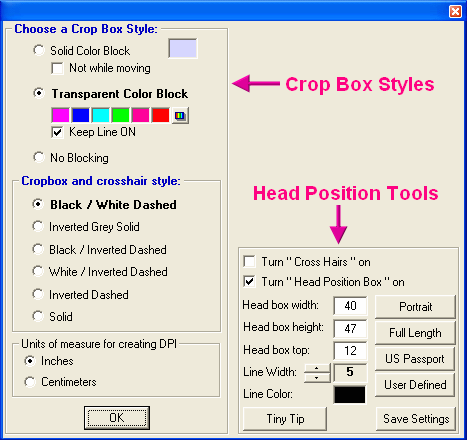
Also see: Head Position Tools
Final Note:
Because the Auto Batch Crop feature happens so fast and there is no user intervention, except to abort, this feature will not allow
you to overwrite original images.
When the batch process starts, it will turn on the add a prefix option. Doing this, forces new image files to be created and prevents the loss of original images.
If the batch process does not turn out the way you hoped, you may delete the new images and do it again with the originals.
About Prefixes:
Some people have complained that they do not like to add a prefix to the filename because they are difficult to remove later. This is not so.
With the Advanced Rename feature, you may quickly and easily remove the prefixes later. Just be sure you use a very unique prefix, such as: zzzz_ or some string of characters that would not be commonly found in
a normal filename.
Home
Privacy Policy
PhotoELF
Download PhotoELF


