<a href="menu.shtml">Table of Contents</a>
<br>
Make a Calendar
There are 2 locations in PhotoELF where you can make a calendar:
- In the PhotoELF Print Page Window
- In the PhotoELF Editor
Using the Editor:
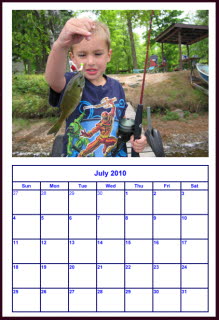
Create a calendar that looks like this:
- Display a photo in the main program and click the Editor button on the toolbar:

- Once you are in the Editor, look in the Fun Stuff menu and select: Make a Calendar Month.
- Your photo will then be loaded into the calendar window where you can:
- Change Month and Year
- Change Line Color
- Change Font Color
- Highlight Text
- Remove the Photo, Replace with Solid Background
- Add a Mask
- Make the Photo Semi-transparent
- Apply and Exit
Once you have created a month, you can then save that image to your hard drive or load it straight into the
print page layout window and print it out.
Hints:
Once you have your month loaded into the print window, you can add more pictures to the page. You
can even crop a picture of someone's face and place it on top of the calendar, (on the date of their birthday).
The calendar's size will be the exact size of the photo that you use. If you need the calendar to be a specific size, you can
either crop / resize your photo first, and then load it into the calendar window. Or you can create a blank image first and load
that into the Calendar Window. To make a blank image, look in the Fun Stuff menu in the Editor.
Using the Print Window:
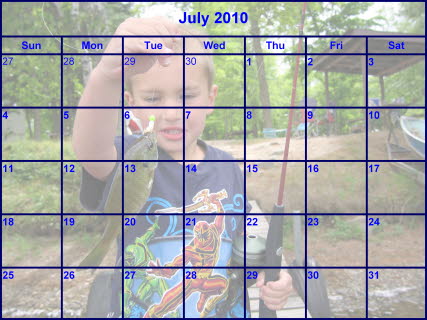
Create a calendar that looks like this:
- Display any photo in the main program and click the Print button on the toolbar:
- Once the print window is loaded with your photo, check to make sure the orientation is correct (Portrait or Landscape)
- If the orientation is not the way you want it, click the "Printer Setup" button
- Your printers control panel will appear. Choose the orientation you wish: (Portrait or Landscape)
- Click OK and when you return to photoelf, click the "update printer changes" button.
- Right click the photo and select: Duplicate - This will create a second image.
- Click the Organize Photos button. (on the right hand toolpanel)
At this point, you can make adjustments to the size of each and the spacing by using the toolpanel
- Once you have the 2 photos arranged the way you want them:
You are now ready to turn one of the photos into a calendar
- Right click the bottom photo and select: Apply Calendar
- When the calendar window appears, click the "Remove Photo" button.
- choose the month and year and click Apply and Exit
DONE
Options at this point:
- Send the page to your printer.
- Save this layout as a project to be printed or edited at a later time.
(click the PROJ button in the upper right corner of the print window).
Once it is saved as a project, you can open it up later and do more things to it, or print it again.
(see projects and templates)
- Save the layout to be printed at a professional photo printing store.
- Click the JPG button in the upper right corner of the print window
- This feature will merge all of the photos and text on the layout into 1 big photo
- After clicking the JPG button:
- Choose your size: (we suggest Large or X-Large for printing later)
- Choose a background color
- Click the Build Photo button
- Click the SAVE button and save the resulting photo to your hard drive.
You can then take the saved image to a Photo Processing Kiosk or store and have it printed.
Home
Privacy Policy
PhotoELF
Download PhotoELF