<a href="menu.shtml">Table of Contents</a>
<br>
Printing Business Cards, Labels, Buttons
or Any Perforated / Label Paper
The following example assumes you want to make business cards, but this example will work with just about any type of printing on a pre-defined paper
such as
perforated business card stock, label paper, CD-ROM labels or any stock paper with a grid pattern where duplicating on the
same sheet is required.
First, you need to create your artwork for each business card, label or button:
- Measure how big your business cards are. Example: most are 2 x 3 inches
- Go into the PhotoELF Print Window and click the CANV button in the upper
right corner.

- Turn Canvas Mode ON. For more information on Canvas Mode, Click Here
- Select a page size of: 2 x 3 inches and select Landscape mode
- Now click the SIZE button in the upper right corner and add any photos you want to the layout.

- Click the TEXT button in the upper right corner and add FREE TEXT to the page
and type and arrange it the way you want it. For more information on FREE TEXT, Click Here
- Arrange text and photos as you wish.
- Once you have it the way you want it, Click the JPG button in the upper
right corner.
This feature will allow you to merge the entire page into 1 big photo and save it to your hard drive. This will be your Artwork
For more information on this JPG Feature, Click Here
While in the JPG feature, choose background color, choose X-LARGE size, click BUILD
PHOTO, then SAVE this image as a JPG or BMP image on your hard drive.
You have successfully created your artwork and saved it. However, what if you would like edit this business card again in the future?
You may wish to save this layout as a Project so you can edit or move things around in the future and print again.
To save this as a project:
- Click the PROJ button in the upper right corner and choose "Project" and
save this layout as a project and name it "Business card". For more information on Projects, Click Here
- Close the print window
You are half-way done!
The second step is to layout your business card artwork in the print window to correspond with your stock paper.
You have just created your artwork for 1 business card.
Now you need to duplicate that artwork in the print window for printing on your business card stock paper:
- Be in photoelf's main program
- Select the business card artwork you just created and display it in the main viewer
- Click the Print button on the toolbar to load the print window
- Make sure you are in Printer Mode and NOT canvas mode. Click the CANV
button in the upper right corner and change to Print Mode.
- Click the SIZE button in the upper right corner to have size and position control
- Click your business card image to produce the blue size squares around it.
- Click and drag one of the blue size squares until the card is exactly 2 x 3 inches. The size of the image is reported
on the Size Tool Panel on the right.
- Duplicate the photo as many times as needed to fill the sheet per your
requirements. If you are using that store bought business card perforated
paper, count how many you need and duplicate accordingly.
Click your business card artwork and then click the Duplicate button on the toolbar (top left of window) or right click your card
image and select: Duplicate
- Click and drag each photo to position it on the page to approximate the layout of your perforated paper stock
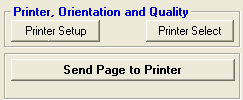
- Click the Printer Setup button and change your printer setting for fast print, low quality and plain paper.
- Print a test sheet onto plain paper. Do NOT use your card stock yet.
- Lay the printed test sheet over your business card paper and hold it up
to the light and see if you have everything lined up correctly.
- make adjustments to the print page as needed
- Print another test sheet, repeat as needed
- When you finally have it right,
click the PROJ button in the upper right corner and save this layout as
a project. This way, you can recall this project any time and print it again, or edit it again.
- Now click the Printer Setup button again and change to High Quality print mode and print the page onto your business card stock
Now, in the future, all you have to do is load that project, go into printer
set up and choose "High Quality" and the paper type and you are ready to
print more business cards.
There are a lot of steps above to get it set up. But once it is set up, you
will be able to print out your business cards quickly. And, you will
understand a good many features in the photoelf print window. And the next
time you need to do a project like this, it will go much easier.
Home
Privacy Policy
PhotoELF
Download PhotoELF