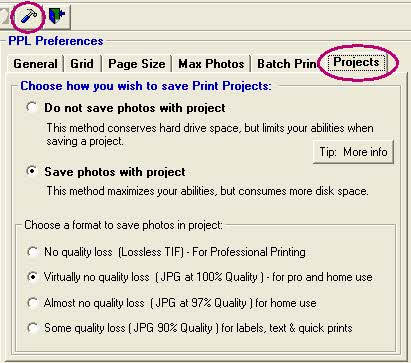
<a href="menu.shtml">Table of Contents</a> <br>
Table of Contents: Photo Printing and Editing Software HELP Photo Printing Software Help Download Photo Printing and Editing Software Buy Now Best Photo Printing and Editing Software Website


Project Saving Options

Project files are very tiny files located in: C:\Program Files\PhotoELF\ELFfiles\PPL and they consume almost no space on your hard drive.

They are simple text files which tell PhotoELF the location, on your hard drive, of the photos in the project. It also contains the location on the paper where you wish to have each photo and any text you have added to the page.

Projects may be saved in two forms:

1) Do not save photos with project

2) Save photos with project


1) Do Not Save Photos with Project


This method should be selected if you have a small hard drive and wish to conserve hard drive space.

The downside to this method, is that the project file remembers where your photos are located on your hard drive. If you move or rename your photos, PhotoELF will not be able to find them and will bark at you when you attempt to load that project.

And, because this method does not save (or store) the photos for you, you are not allowed to edit a photo in the print window. If you do, and you save a project, it will not save the edited changes to your photos.

If you use this method, always edit your photos prior to loading the print window.

2) Save Photos with Project

This method saves the same tiny project file as above, but it also saves each image on the page into a special folder inside of:     C:\Program Files\PhotoELF\ELFfiles\PPL\Images    

This method is nice because it will save any editing you did to the photos while in the print window, like: rotating, cropping, adding a mask, fixing brightness, contrast etc. etc. All changes will be saved.

This method does not effect your original images. It simply takes the images on the current layout and resaves them, exactly as they are, in a stable location inside of the PhotoELF program folder.

This method is great for: scrapbooking, montages, cards, labels, reports, claims, professional printing, and brochures etc.

This method also lets the user choose which format they wish to use when these files are saved. This gives professional photographers the ability to save projects in a Lossless format. The only downside, is that the Lossless TIF format consumes more hard drive space:

Note: If you do not edit any of the photos in the print page window, then the photos will not be re-saved. Instead, they will be copied from their original location into the PhotoELF program folder and they will not have gone through a recompression. This is zero quality loss.

On the other hand, if you do edit any photo (rotate, crop, brightness) while in the print window, then all photos on the page will be saved (recompressed if you choose JPG) into the PhotoELF program folder.

Either method (1 or 2) works fine and in case 2, save photos with project, you will not notice any quality degradation.


To access these options, enter the Print Page Layout window
Click the hammer on the toolbar
Then click the Project tab:


No quality loss (Lossless TIF)Absolute quality - large amount of disk space consumed - great for use with high end professional printers
Virtually no quality loss (JPG 100%)Excellent quality - consumes 1/6th the space of TIF - great for use with high end professional printers and home printers
Almost no quality loss (JPG 97%)Good quality - consumes 1/2 the space of JPG 100 - great for home printing
Some quality loss (JPG 90%)Excellent quality - consumes 1/2 the space of JPG 97 - great for quick projects, text documents, cards, scrapbooking, reports etc.


To read more about Projects and Templates, click the following links:

Projects and Templates
Editing Existing Projects and Templates
How to create your own Template


Home       Privacy Policy       PhotoELF       Download PhotoELF